Victory: one of my tiny white whales has been slain.
Flashing OpenWrt to your router is easy as pie – at least in some cases – in other only if you know what you’re doing and a suitable firmware file is available.
I have to admit it took me almost 2 years to get OpenWrt on my Linksys wag160n v1.
Today I conquered that tiny white whale of mine.
I bought the unit back in 2011 because it seemed like a good choice looking at the OpenWrt toh (supported hardware) – at the time.
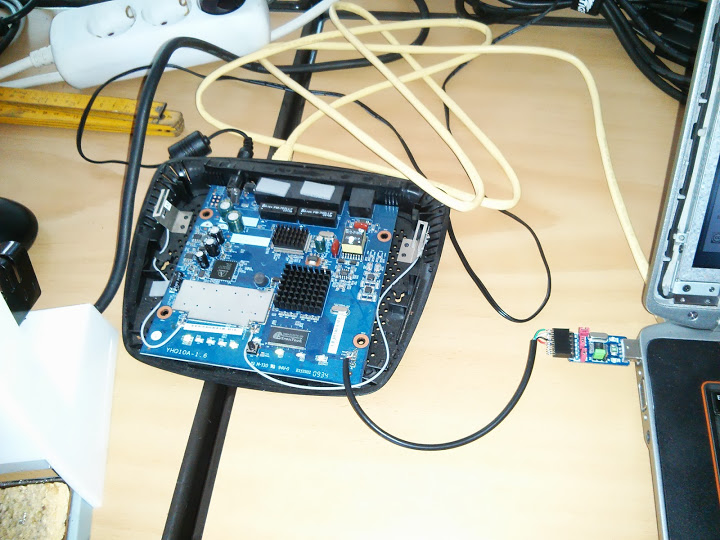
After I got it I quickly soldered the serial connector to the board and dumped the configuration data for the ath chip as described in the OpenWrt wiki.
After that it took me quite some time trying to build my own firmware – incorporating all the patches which should yield in a usable firwmare.
I got that done enduring some pain (a few days of forcing myself to patching files and compiling the firmware).
So there I was with the untested firmware file that still wouldn’t upload through the webinterface of my Linksys router.
Frustrated I threw the unit into it’s box and then some corner.
While moving the box hit the light of day again so I saw myself forced to either conquer the box or throw it in the trash.
Today I managed to get it done – and here is how that works:
You need to get a tftp server up and running (I’m running some Ubuntu).
sudo apt-get install tftpd-hpa tftp
Be sure to test the setup – put some file in /var/lib/tftpboot e.g.
sudo sh -c 'echo "hallo" > /var/lib/tftpboot/test'

tftp localhost
 get test
 Received 7 bytes in 0.0 seconds
So now you’re sure your tftp server works.
You can get the firmware for the wag160n v1 (Attitude Adjustment, r34073) here which is built by Virus or try the related wag160n_v1 forum thread.
Copy your downloaded/built openwrt image to to /var/lib/tftpboot
sudo cp openwrt-WAG160Nv1-squashfs-cfe-attitude-adjustment-beta-2.bin /var/lib/tftpboot/bcm963xx_fs_kernel
That file (and the name needs to be bcm963xx_fs_kernel because that’s the IP the wag160n CFE expects) is now waiting there to get pulled by your router.
Connect to your router with an ethernet cable.
Assign 192.168.1.100 to your box – because that’s what the wag160n will try pull the boot image from
(192.168.1.100 as gateway).
Next up you need to connect to the wag160n through telnet.
Setup minicom:
sudo minicom -s
-> serial port setup
A -> /dev/ttyUSB0 (or dev/ttyACM0 or whatever)
E -> E (115200) -> Q (8N1)
-> safe setup as dfl (or as <configuration_name>)
and connect with:
sudo minicom
or if you saved a named config with:
sudo minicom <configuration_name>
You should now be presented with a boot screen after plugging the power supply into the wag160n.
Wait for:
*** Press any key to stop auto run (1 seconds) ***
And press a key. Now you’re in CFE:
CFE>
press f.
Loading 192.168.1.100:bcm963xx_fs_kernel ...

Finished loading 2752516 bytes

Flashing root file system and kernel at 0xbfc10000: ............................

.
 *** Image flash done *** !
 Resetting board...
And that’s it. Next time you will be greeted by the openwrt screen.
</pre>
BusyBox v1.19.4 (2012-11-04 23:56:37 CET) built-in shell (ash)
Enter 'help' for a list of built-in commands.

_______ ________ __
 | |.-----.-----.-----.| | | |.----.| |_
 | - || _ | -__| || | | || _|| _|
 |_______|| __|_____|__|__||________||__| |____|
 |__| W I R E L E S S F R E E D O M
 -----------------------------------------------------
 ATTITUDE ADJUSTMENT (Attitude Adjustment, r34073)
 -----------------------------------------------------
 * 1/4 oz Vodka Pour all ingredients into mixing
 * 1/4 oz Gin tin with ice, strain into glass.
 * 1/4 oz Amaretto
 * 1/4 oz Triple sec
 * 1/4 oz Peach schnapps
 * 1/4 oz Sour mix
 * 1 splash Cranberry juice
 -----------------------------------------------------
Set a root password through telnet
passwd
and you’re good to connect through ssh.
Another option would be to hexedit the firmware file so you can load it through the Linksys firmware upgrade.
You would still need telnet to the box because ssh is only enabled after setting a root password with the above linked firmware file.